

昨天看到一个颜值很不错(作者自评)的中转面板,技术栈使用了 Next.js、Tailwind CSS 和 Prisma ,后端中转则是使用gost和iptables。目前该项目可以在Docker进行部署,也可以在Vercel上进行部署。

Docker部署
注意需要使用Docker Compose进行编排,vortex包括前端面板和承载agent-file文件的容器,另外我还使用了nginx作为前端反向代理,这样可以不暴露太多端口。你可以按官方的方法,逐步修改,也可以直接套用我的。
首先git clone 本仓库,然后进入该仓库的deploy文件夹,我已经提前准备了一些文件,方便开箱即用。
# git clone https://github.com/icodex/vortex
# cd vortex/deploy首先将deploy.env重命名为.env
# mv deploy.env .env在.env文件中,需要做一些修改,如下是改过之后的,你如果要直接用,注意替换里面的vort.me域名以及SMTP服务器信息等:
DATABASE_URL="postgresql://postgres:postgres123@vortex-postgres:5432/vortex"
POSTGRES_USER="postgres"
POSTGRES_PASSWORD="postgres123"
POSTGRES_DB="vortex"

NEXTAUTH_SECRET="ozlieHkJvPLmWNsip+YtSen9r95+qYXfHdt3046bYTs="
NEXTAUTH_URL="http://vort.me"

EMAIL_SERVER="smtp://[email protected]:[email protected]:587"
EMAIL_FROM="Vortex <[email protected]>"

REDIS_URL="redis://vortex-redis:6379"
REDIS_USERNAME="vortex-main"
REDIS_PASSWORD="redis123"
REDIS_DB="0"

SERVER_URL="http://vort.me"
AGENT_SHELL_URL="http://vort.me/agent_files"
AGENT_REDIS_URL="redis://vort.me:18044"

DEPAY_INTEGRATION_ID=""
DEPAY_PUBLIC_KEY=""

NEXT_PUBLIC_UMAMI_URL="https://stats.vort.me"
NEXT_PUBLIC_UMAMI="https://stats.vort.me/script.js"
NEXT_PUBLIC_UMAMI_ID="ffffffff-3333-6666-9999-ff0123456789"
redis需要配置密码,需同时编辑.env和redis.conf文件,在redis.conf的865行和1045行找到‘requirepass {your_password}’,将{your_password}改为.env内REDIS_PASSWORD的值,如下:
...
# If you set the value to 0, it means there are no limits, and Redis will
# retain as many keys as needed in the invalidation table.
# In the "stats" INFO section, you can find information about the number of
# keys in the invalidation table at every given moment.
#
# Note: when key tracking is used in broadcasting mode, no memory is used
# in the server side so this setting is useless.
#
# tracking-table-max-keys 1000000

################################## SECURITY ###################################
## 服务端 redis 连接用户密码
user vortex-main on -@all +@read +@write +@connection +@pubsub +acl +info ~* &* >{your_password}
# Warning: since Redis is pretty fast, an outside user can try up to
# 1 million passwords per second against a modern box. This means that you
# should use very strong passwords, otherwise they will be very easy to break.
# Note that because the password is really a shared secret between the client
# and the server, and should not be memorized by any human, the password
# can be easily a long string from /dev/urandom or whatever, so by using a
# long and unguessable password no brute force attack will be possible.
...
...
# IMPORTANT NOTE: starting with Redis 6 "requirepass" is just a compatibility
# layer on top of the new ACL system. The option effect will be just setting
# the password for the default user. Clients will still authenticate using
# AUTH <password> as usually, or more explicitly with AUTH default <password>
# if they follow the new protocol: both will work.
#
# The requirepass is not compatible with aclfile option and the ACL LOAD
# command, these will cause requirepass to be ignored.
#
requirepass redis123
# New users are initialized with restrictive permissions by default, via the
# equivalent of this ACL rule 'off resetkeys -@all'. Starting with Redis 6.2, it
# is possible to manage access to Pub/Sub channels with ACL rules as well. The
# default Pub/Sub channels permission if new users is controlled by the
# acl-pubsub-default configuration directive, which accepts one of these values:
...然后是docker-compose.yml,默认添加了nginx作为反代,如果你不需要,可以移除。另外vortex-agent镜像是我自行制作的,如果你觉得不安全,可以自行制作,制作方法到后面看。
version: "3.3"

services:
  vortex:
    container_name: vortex
    image: jarvis2f/vortex:latest
    env_file:
      - .env
    restart: always
    volumes:
      - /etc/localtime:/etc/localtime:ro
    ports:
      - "18000:3000"
    depends_on:
      - vortex-postgres
      - vortex-redis

  vortex-postgres:
    container_name: vortex-postgres
    image: postgres:16.1-alpine3.19
    env_file:
      - .env
    environment:
      - POSTGRES_USER=${POSTGRES_USER}
      - POSTGRES_PASSWORD=${POSTGRES_PASSWORD}
      - POSTGRES_DB=${POSTGRES_DB}
    restart: always
    volumes:
      - /etc/localtime:/etc/localtime:ro
      - ./db:/var/lib/postgresql/data

  vortex-redis:
    container_name: vortex-redis
    image: redis:7.2.4-alpine
    restart: always
    command: [redis-server, /etc/redis/redis.conf]
    volumes:
      - /etc/localtime:/etc/localtime:ro
      - ./redis/data:/data
      - ./redis/redis.conf:/etc/redis/redis.conf
    ports:
      - "18044:6379"

  vortex-agent:
    container_name: vortex-agent
    image: icodex/vortex-agent
    restart: always
    ports:
      - "18022:18022"
    depends_on:
      - vortex

  nginx:
    container_name: nginx
    image: nginx:latest
    restart: always
    volumes:
      - /etc/localtime:/etc/localtime:ro
      - ./proxy.conf:/etc/nginx/conf.d/proxy.conf
    ports:
      - "80:80"
    depends_on:
      - vortex-agent
如此就可以了,执行docker compose运行该项目吧
# docker compose up -dvortex-agent镜像制作
官方仓库在打包时有点问题,我做了一些必要的修改,并提交了pull request,但还没有合并进去,现在已经合并到主线版本。因此你可以自行制作一个自己的镜像,方法如下:
# git clone https://github.com/jarvis2f/vortex-agent
# cd vortex-agent
# docker build . -t icodex/vortex-agent
Vortex使用
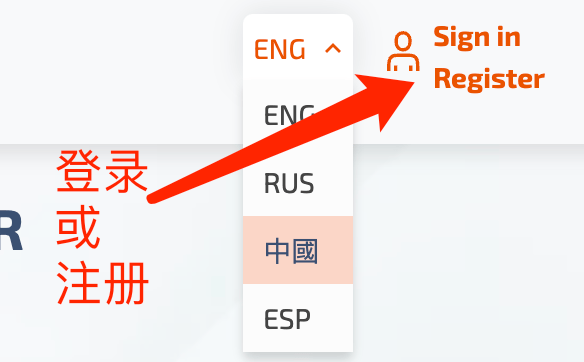
完成以上部署之后,打开你的浏览器,输入域名就可以开始使用了,默认没有管理员账号,第一个注册的用户就会成为管理员。注册需要使用smtp发送验证邮件。

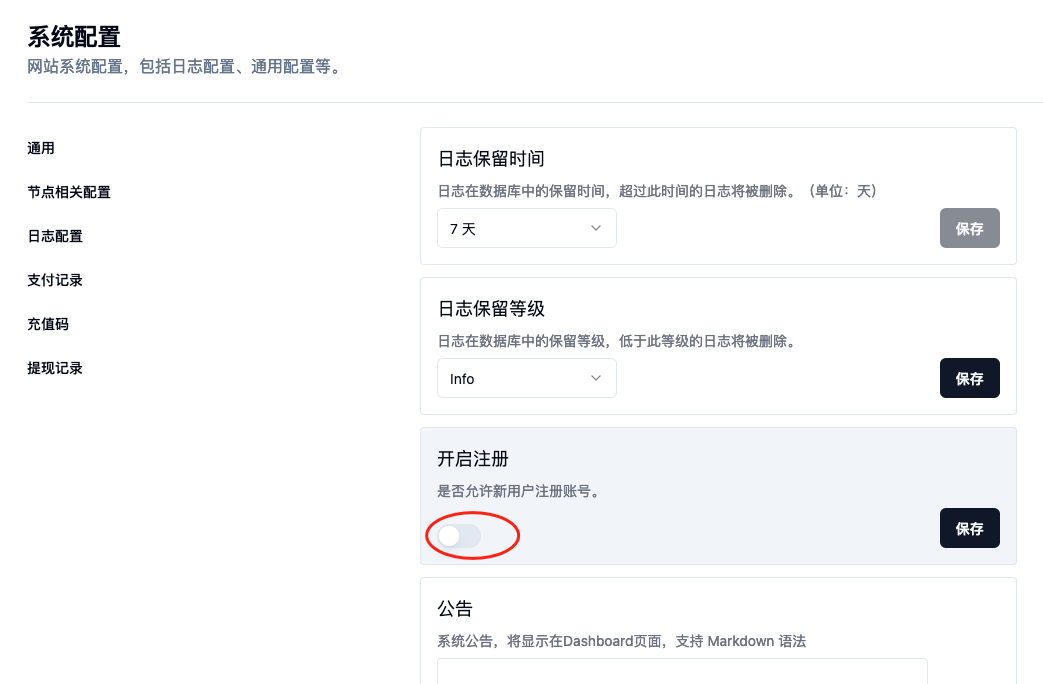
⚠️注意,如果你不想被滥用,可以到后台关闭前台的注册行为:
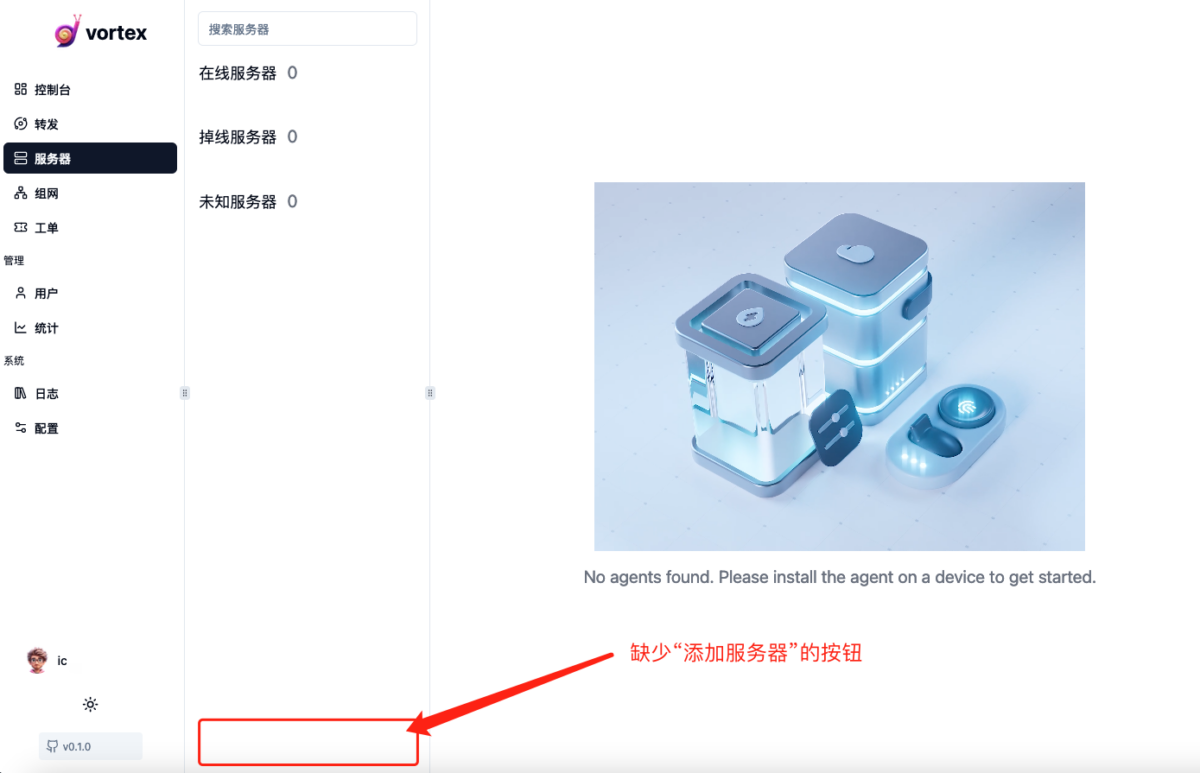
默认情况下,用户没有添加服务器的权限,在“服务器”菜单缺少了“添加服务器”的按钮,如下:
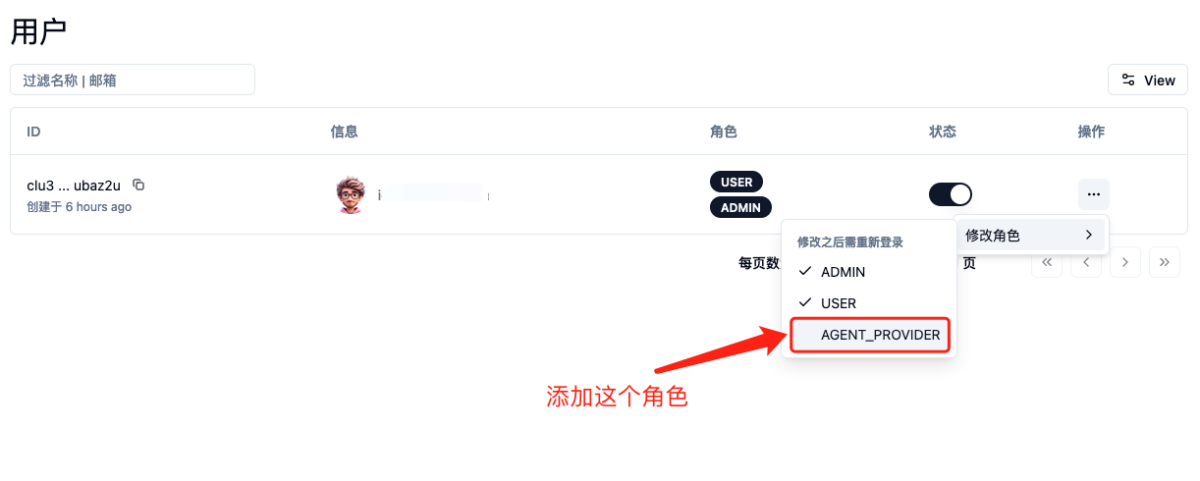
需要到用户菜单,找到对应的用户,添加权限然后退出再登录一次就可以看到“添加服务器”的按钮了
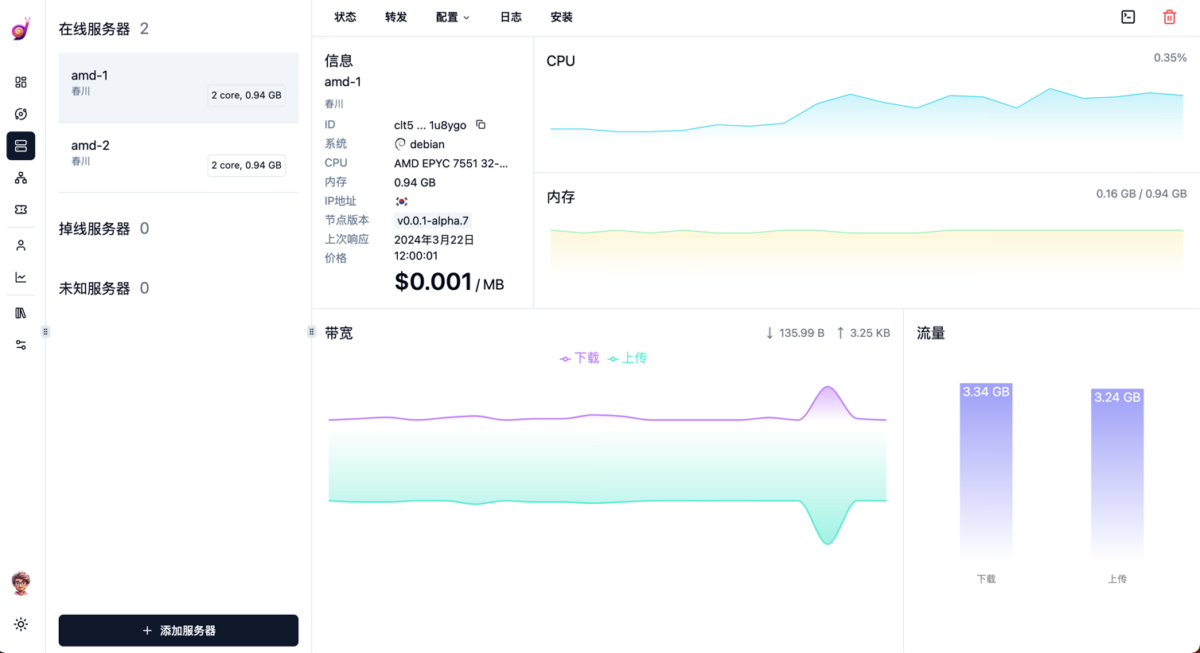
添加服务器
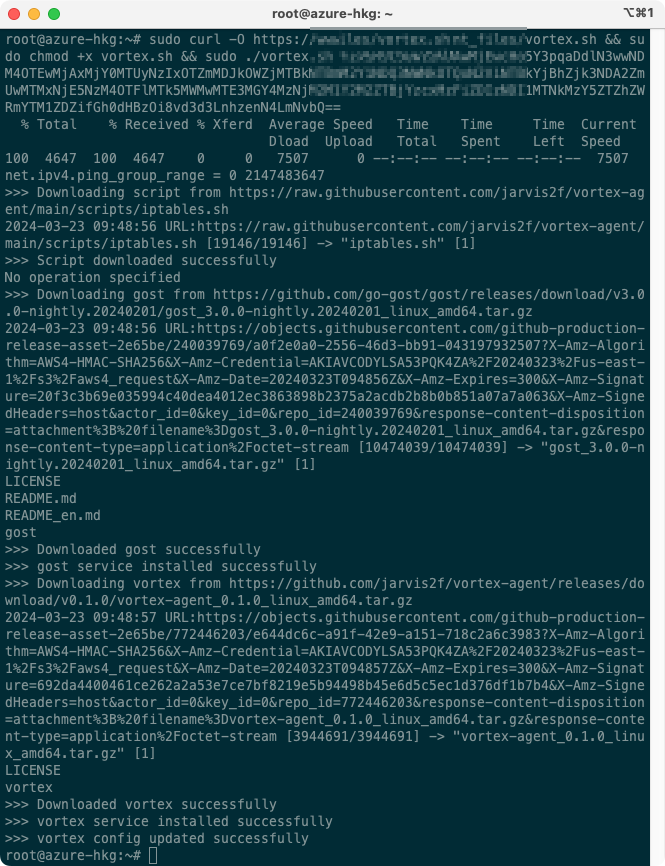
然后到服务器菜单,添加你的第一台服务器吧
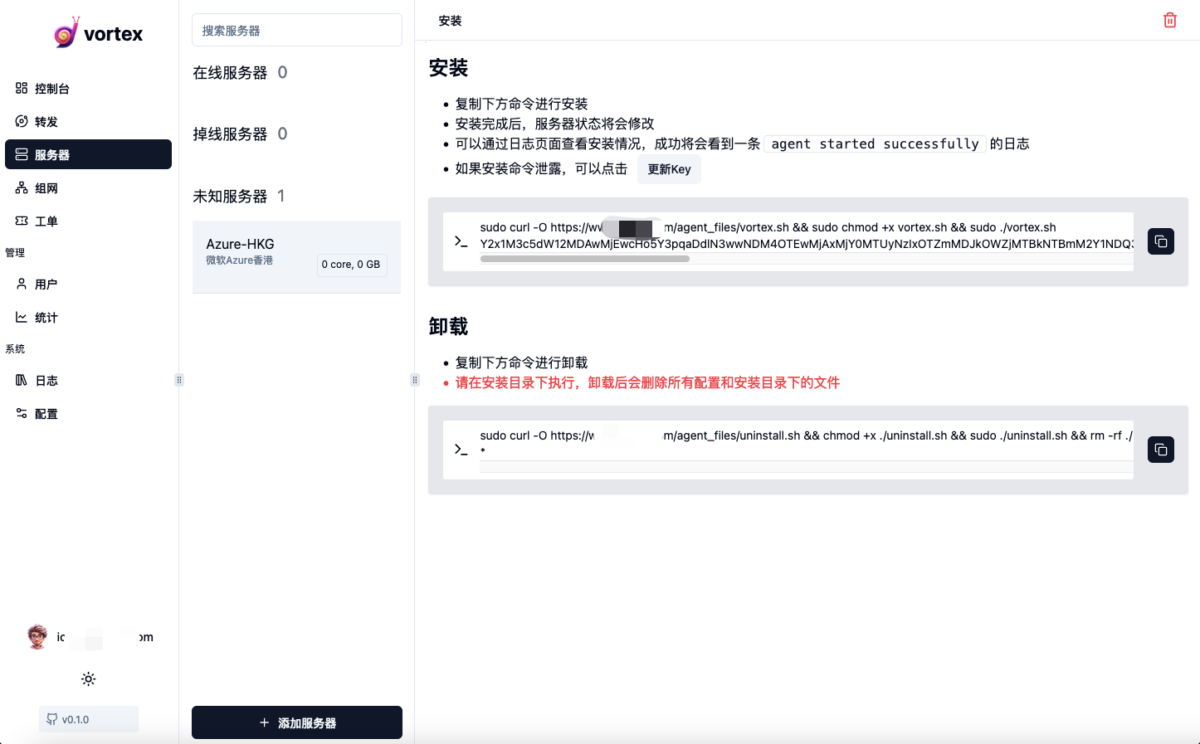
在目标服务器执行后就可以了
感谢作者的开源,致敬🫡!更多内容和更新,请持续关注作者的Github吧!https://github.com/jarvis2f/vortex
您也可以联系文章作者本人进行修改,若内容侵权或非法,可以联系我们进行处理。
任何个人或组织,转载、发布本站文章到任何网站、书籍等各类媒体平台,必须在文末署名文章出处并链接到本站相应文章的URL地址。
本站文章如转载自其他网站,会在文末署名原文出处及原文URL的跳转链接,如有遗漏,烦请告知修正。
如若本站文章侵犯了原著者的合法权益,亦可联系我们进行处理。


![表情[xiaojiujie] - EVLIT](https://cdn.evlit.com/wp-content/themes/zibll/img/smilies/xiaojiujie.gif)
- 最新
- 最热
只看作者